Intro - Making a Simple Slideshow
[ Intro ] [ Storyboard Editor ] [ Frame Editor ] [ Event Editor ] : : [ Next Lesson : Bouncing, Collisions, Paths ]
| "Multimedia Fusion is the most flexible, powerful, and full-featured authoring tool available today. Best of all, you can get superior and impressive results with no programming skills or knowledge required. Discover the secret tool used by so many multimedia pros, game creators, and people from all walks of life. Simply start by creating a frame containing any graphics you desire. Then start inserting and dragging objects. Finally, set their behaviors in the intuitive, grid-style Event Editor and you are on your way to great creations! But this fast and effective approach does not sacrifice flexibility and power. The objects, called extensions, in Multimedia Fusion allow you create even the most complex and fully functional software as you become more familiar with them. Multimedia Fusion provides you with everything you need to start creating software of your own imagination and design. From multimedia applications and presentations, to exciting games and stunning screensavers, you can be creating, sharing, and even publishing your work in no time." - Clickteam | "It has been my observation that for every 20 students I witness diving into a complex language like C++ only 1 survives the almost yearlong ordeal to make even the simplest game. Those that start with good libraries (e.g. SDL, Allegro) elevate this success to 1 in 10. But, imagine a tool that could transform your game idea from concept to completion in less than 1/10th the time with a near 100% success rate! Multimedia Fusion is that tool. True, spending years to learn a complex programming language has many benefits, but the graveyard of failures is so immense that one can't help but wonder what fantastic applications could have been... but never survived the challenge. And we can all agree that the enduring titles have always been those with playability, i.e. engaging content, depth, and ease of use. Multimedia Fusion allows you, the developer, to focus your full attention on this playability factor!" - Mr. Jacobson |
[ Storyboard Editor ] [ Frame Editor ] [ Event Editor ]
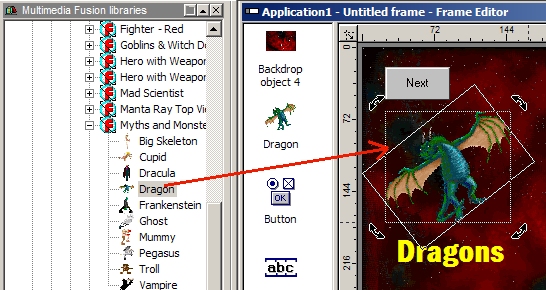
| INTRO - Getting Started If the Vitalize plugin is properly installed you should see an actual interactive Multimedia Fusion example slide show imbedded in this web page below. You can download the editable source file HERE. In this fast track tutorial series you will learn the most common features of Multimedia Fusion so that by lesson 6 you will have made a slide show and a mini-game and converted them both to web playable form to distribute to your friends! In this first lesson (Windows experience is assumed) you will familiarize yourself with the main editors (introduced as needed) and make a slide show style presentation in the process. Let's get started! 1) Start Multimedia Fusion and close the "Tip of the day" box. 2) If you don't see the MMF libraries window click VIEW - Multimedia Fusion Libraries 3) Begin a new application clicking FILE - NEW - APPLICATION 4) Arrange the windows (and expand the library folders) as indicated below to allow you more workspace 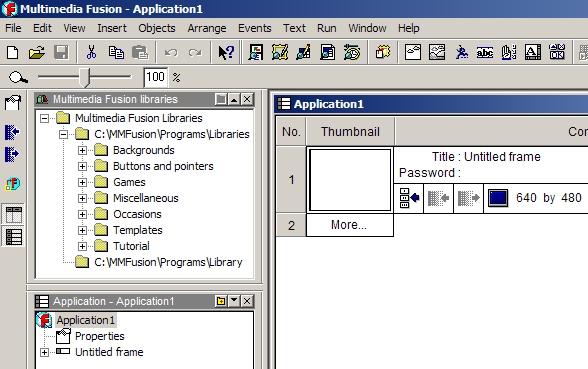 |

|
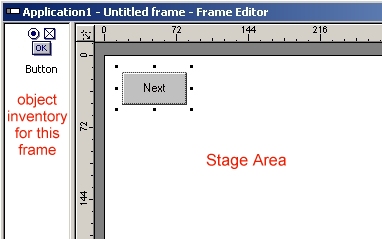
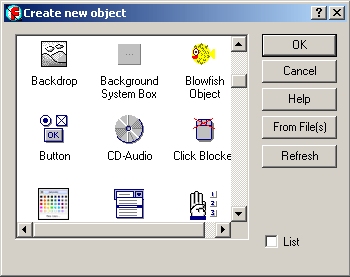
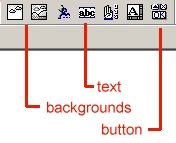
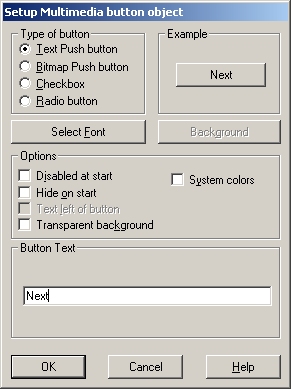
The event editor is the power center where controls and object interactions are scripted. Clicking an object to start an event, pressing a key to go to the next slide or move your character, making objects move and bounce, or causing a sound to play are just a few of the endless possibilities. For this slide show we need to make our "Next" button have an event that when clicked will advance our presentation to the next slide. Whatever slide you happen to be working on in the Frame Editor can now have it's events scripted by clicking on the Event Editor button 1) Right click on "New condition" 2) Right-click on the button icon from this frames object inventory box 3) Select "Button clicked?" from the dropdown options 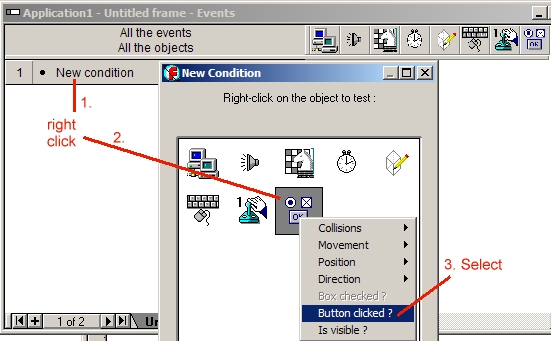 In your new "Button clicked" row go across to the 3rd column under the Storyboard Control icon and right-click to open the options dropdown list and select "Next frame". A check will appear in that box and now the button will actually work when you run the application! Don't forget to go select the 2nd slide and repeat this whole process so that the button on that slide works too :)  Now, if you have all your 3 slides fully decorated and ready, it's time to RUN your application!!! 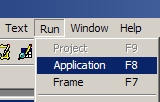 Go back now if you wish into the Storyboard Editor Tips: "If in doubt, Right-click!" Objects can be locked (to avoid accidental deletion) or moved to overlap above or below others by right-clicking on them and changing these properties. Challenge: Make a Replay button on slide 3 that starts the slide show over again. |