Bouncing, Collisions, Paths
[ Player Control ] [ Bouncing ] [ Collisions ] [ Paths ] : : [ Next Lesson : Making a Shooter! ]
| In this tutorial you will be exploring some basic player and object movements that will turn a static scene into an interactive experience.
Using the keyboard to move a character around the scene, making objects and enemies fly around or bounce off other objects
or follow a specific path in your new world are just a few of the elements you will master here.
Click in the window above (so the game has focus instead of the surrounding web page) and then use the arrow keys to bounce your ship into the asteroids! 1) Start Multimedia Fusion and close the "Tip of the day" box. 2) If you don't see the MMF libraries window click VIEW - Multimedia Fusion Libraries 3) Begin a new application clicking FILE - NEW - APPLICATION 4) Arrange the windows (and expand the library folders) as indicated below to allow you more workspace 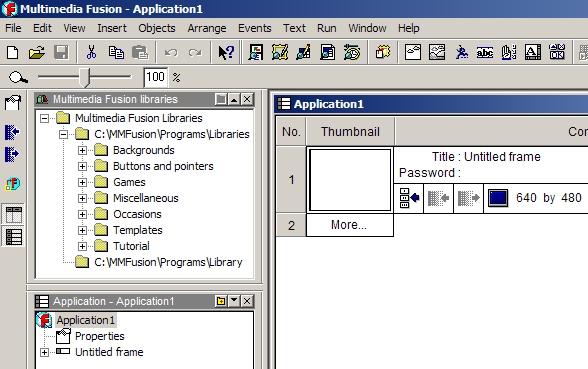 5) Open the Frame Editor  (from the taskbar) and
drag out 2 different objects onto the (from the taskbar) and
drag out 2 different objects onto the stage, Saucer from the MMF Libraries - Games - Spacecraft - Aliens folder and Agate Ball from MMF Libraries - Games - Miscellaneous - Game Objects 2 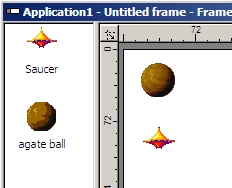 Player Control This is where you will add the ability to control player object movement with the keyboard (or mouse, or joystick). And you'll be suprised how easy it is to do! You can even setup multiple player objects for control by up to 4 people (although that tends to get a little crowded around the keyboard). First, right-click on Saucer on the stage and pick Properties - New Movement. 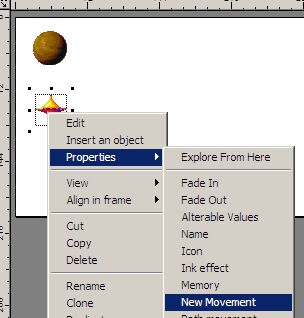 The top 4 options allow your player controlled object all the standard movement types you might expect in the various game genres. Feel free to experiment with all 4 control styles by just repeating the previous step. For now though, choose Eight Directions. 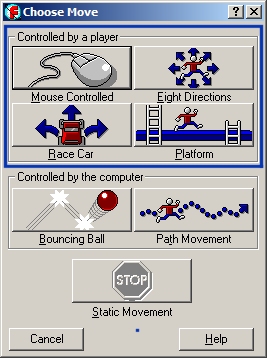 Most of the defaults settings for Eight Direction control (using the arrow keys) are just fine for most purposes so go ahead and click Try movement . A play screen should open with just that object on the stage. Use the arrow keys and watch the magic as you move the Saucer around the stage! 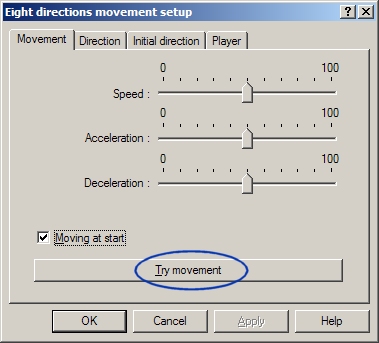 look for the small control box in the upper left or just press the "ESC" key to stop. If the movement is just right for your purposes you can click on OK to accept the settings, otherwise feel free to adjust the speed, acceleration and deceleration to get an idea of how these properties affect movement. If you have an application where you wish to limit the player movement to just up and down or left and right, click on the Direction tab and uncheck the direction arrows you wish to prohibit. The Player tab is for use in multiplayer games. Go back now if you wish and try Mouse, Racecar, and Platform control options. You'll have to start back in the frame editor and right-click the object selecting Properties - New Movement to bring up the 4 choices again. Before proceding to the next section, make sure you return player control to Eight Direction (and click OK). Bouncing Bouncing is a computer controlled function (often used for interfering 'enemy' type behavior) and is a little trickier to do because when you go to Try movement the object will just fly off the stage before it bounces against anything so you will have to go into the Event Editor Right-click on agate ball on the stage and pick Properties - New Movement and then under the 2 Controlled by the computer options, choose Bouncing Ball. You can Try movement if you wish but sadly at this point it will just leave the screen. 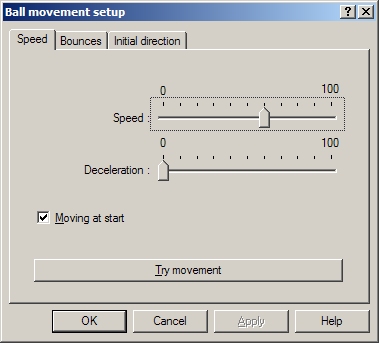 The Bounces tab has the Randomizer and Security settings and can usually be left alone. Randomizer adds an element of upredictability about the direction after the bounce. Security is a features that allows the engine to dislodge an object that may have got stuck bouncing forever between other objects. Click OK and then launch the Event Editor 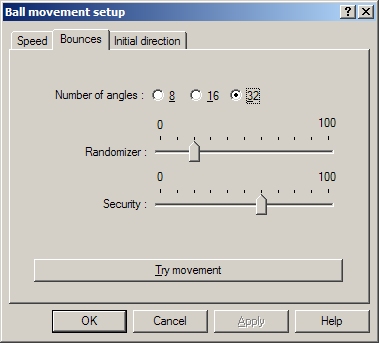 Right click New condition then right click on the ball, select Position - Test position 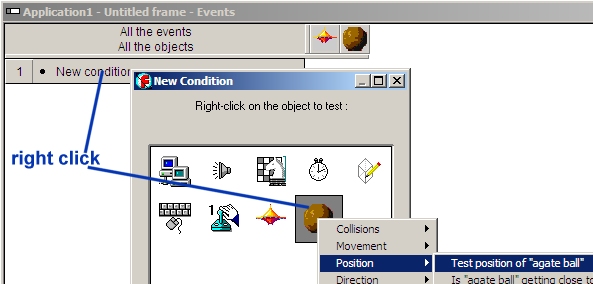 Select the 4 inner perimeter frame area arrows and click OK. to create the event "[ball] leaves the play area" 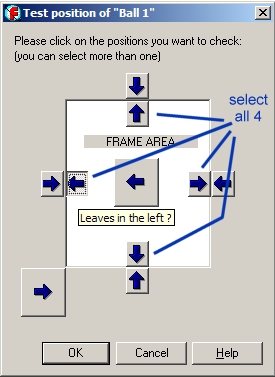 Right click in the square shown and choose Movement - Bounce. Now the ball will bounce off the edge of the screen when it attempts to leave the play area. If this were an asteroids style game you would choose Wrap Around instead of Bounce so that when it leaves the play area it reappears on the opposite side of the play area. 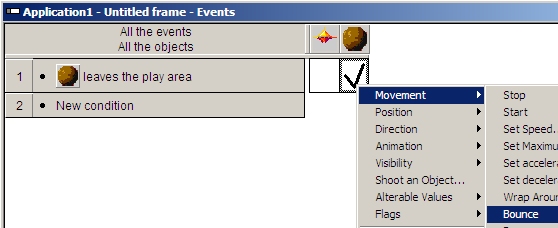 If you press play Collisions To make the ball bounce off your ship you will have to setup a collision event. In the Event Editor 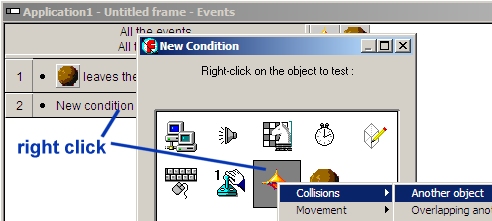 Select the ball... 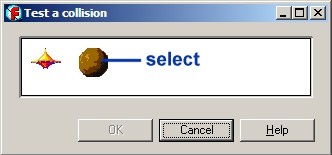 In the new row "Collision between [ship] and [ball]" right click under both columns and choose Movement - Bounce 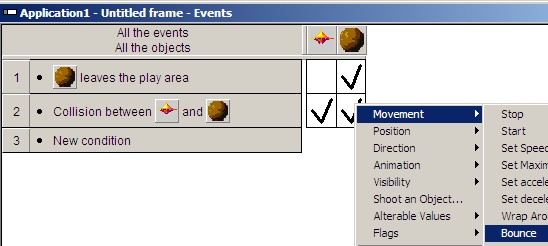 Now when you press play Paths Some objects/enemies you may want to follow a specific path around the play area (e.g. Invaders move back and forth slowly going from the top to the bottom). Drag another object out into the stage area. You will delete this object before the next assignment. Right click on the object and choose Path Movement. A path movement control panel will appear allowing you to create a path that can be as simple or as complex as you like. 1) Clicking the first option will create a stretchy line between the object and your mouse cursor. 2) Click the mouse pointer in some other place out on the stage to set the end of the straight line path. 3) Click the LOOP icon and the REVERSE icon and 4) Try Movement . The object should move back and forth along the path continuously! 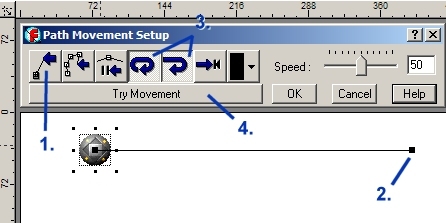 The 2nd path option will allow you to create complex custom paths that you can trace and record with the mouse pointer. The 3rd option will allow you to set pauses if you so desire. After you have experimented to your heart's delight, select and delete this object, and SAVE your work for the next lesson. Tips: In the game control toolbar Challenge: Select the ball in the Frame Editor, COPY and PASTE 2 or more balls onto the stage, find and add a Space theme Backdrop to the stage. |