Importing Your Own Media : : [ LAST Lesson : Convert to Web App! ]
|
After exploring and creating games and applications with the available premade Multimedia Fusion library objects you'll probably want to make a game with your own graphics and sounds.
This tutorial will show you the most commonly used import techniques. Yes, that's me and my voice in the game below :) 1) As usual, start Multimedia Fusion and close the "Tip of the day" box. 2) If you don't see the MMF libraries window click VIEW - Multimedia Fusion Libraries 3) Begin a new application clicking FILE - NEW - APPLICATION 4) Arrange the windows (and expand the library folders) as indicated below to allow you more workspace 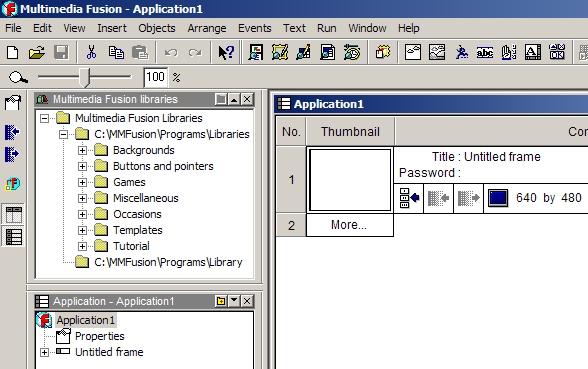 The easiest way to bring your own graphics (e.g. gif, jpg, bmp, png, etc.) into your Multimedia Fusion project is to keep all your original media in a special folder and drag the file from your project folder directly onto the stage. If it's an image then the following window will open expecting you to choose the type of object it will become in your application/game. 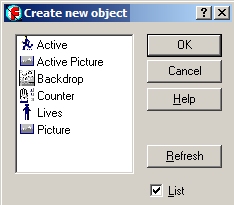 Active means you plan on it being an action object such as a player, enemy, projectile, etc. An Active Picture might be an animated or scrolling background. A Backdrop could be a simple background scene. A Counter object is usually a numeral but could also be a pie chart. A Lives object is just the icon to track the number of player lives. A Picture is just that, a picture. The Active object can be the most sophisticated of all objects, and certainly the most popular, mainly because it can do so much. Below is an active object from a library graphic showing various animated states. A quality Active object has multiple states, directions and animation frames depending on the event it is doing, i.e. walking, running, stopping, jumping, dying (disappearing/destroy), shooting. Each direction or state can have 2 speeds and be looped. The animation editor has a play window to let you see the animations in each of the states. 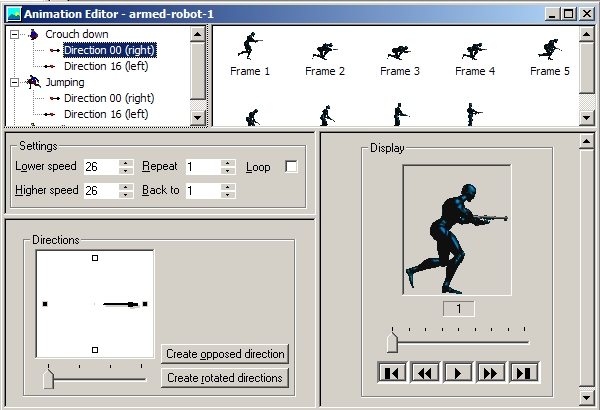 Once you choose Active object you can click on the stage and place the graphic. Double click on the placed graphic and see the Animation Editor display the default Stopped state with the graphic in the right 00 direction and only 1 frame. You can insert additional frames and modify the graphic to give some subtle movement to your character. New directions can also be created easily by just flipping the graphic frames. Right click in the blank area below the states to insert a new animation state. 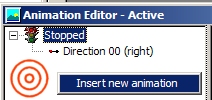 A window will appear with 12 more standard animation state options that are self-explanatory, e.g. tThe Disappearing (Destroy) animation could be frames of your ship exploding or character dying. 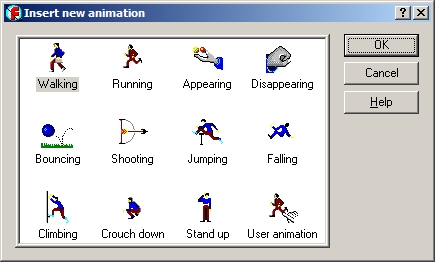 When you add a new frame to a particular direction or state a default diamond graphic will be automatically inserted. This can be a bit of nuisance as you attempt to copy and paste tiles from your own character set. You may first have to clear the frame before pasting your graphic by going into the top menu and select Objects - Clear. The default graphic frame size is 32 x 32 pixels, but when you paste in your own graphic it will prompt you to enlarge if necessary. Under the same menu there are options to resize, rotate, flip, crop or enlarge the canvas. 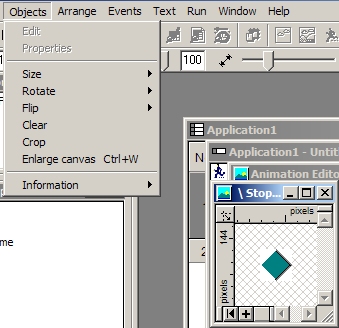 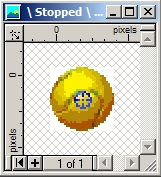 It is also important to keep track of all Hot spots and Action spots in every tile of your Active object. While your frame is open in the editor
you can check these spots by toggling these toolbar icons on the far left. Most hotspots are usually located in the upper left, center or bottom center (platform games) of the image. The default for both spots is the upper left corner of the image. The Action spot is typically where a character fires it's projectile from. On the right is a graphic showing the reticule (cross-hair) of the Hot spot on the center of a library ball object It is also important to keep track of all Hot spots and Action spots in every tile of your Active object. While your frame is open in the editor
you can check these spots by toggling these toolbar icons on the far left. Most hotspots are usually located in the upper left, center or bottom center (platform games) of the image. The default for both spots is the upper left corner of the image. The Action spot is typically where a character fires it's projectile from. On the right is a graphic showing the reticule (cross-hair) of the Hot spot on the center of a library ball object Importing sound is a totally different procedure. Sounds (wav, mid) require insertion from the Event editor panel. Whatever event you wish to have sound associated with needs to be created first. Then right click on that row under the "speaker" sound icon. Play Sample is for shorter sound effects in *.wav format. Play Music is for the instrumental music tracks in *.mid format. 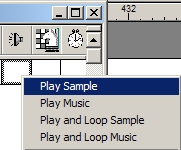 After selecting Play Sample an option box will open that will allow you to choose a sound from your project folder, another project, or record a sound live if you have a microphone. Quality, format, and compression can also be adjusted. 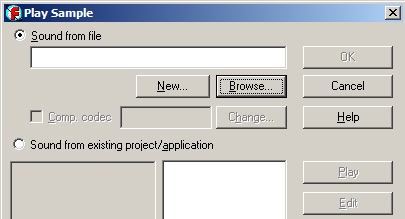
Dragging movies (AVI, MPEG, MOV) from your folder directly onto the stage is also a straightforward process Tips: It is also possible to import 3D models into your game and play CD music tracks ! Challenges: Add sounds and original graphics to your previous lesson file |